Tomb Raider IV Walkthrough

This is the walkthrough for Tomb Raider: The Last Revelation. Find all the secrets and puzzle solving below. The video walkthrough was extracted from Youtube thanks to Tartancroft and the text walkthrough thanks to Stella.
1. Angkor Watt | 2. Race for the Iris | 3. The Tomb of Seth | 4. Burial Chambers | 5. Valley of the Kings | 6. KV5 | 7. Temple of Karnak (1) | 8. Great Hypostyle Hall (1) | 9. Sacred Lake (1) | 10. Temple of Karnak (2) | 11. Great Hypostyle Hall (2) | 12. Sacred Lake (2) | 13. Tomb of Semerkhet | 14. Guardian of Semerkhet | 15. Desert Railroad | 16. Alexandria | 17. Coastal Ruins | 18. Catacombs | 19. Temple of Poseidon | 20. The Lost Library | 21. Hall of Demetrius | 22. Temple of Isis | 23. Cleopatra’s Palaces | 24. City of the Dead | 25. Chambers of Tulun | 26. Citadel Gate | 27. Trenches | 28. Tulun, Citadel, Trenches (2) | 29. Street Bazaar | 30. Citadel | 31. Sphinx Complex | 32. Underneath the Sphinx | 33. Menkaure’s Pyramid | 34. Inside Menkaure’s Pyramid | 35. The Mastabas | 36. The Great Pyramid | 37. Khufu’s Queen’s Pyramids | 38. Inside the Great Pyramid | 39. Temple of Horus
8. Great Hypostyle Hall (1)
INTERIOR ROOM WITH RED LIGHTING: You first enter this level by sliding down a ramp from the TEMPLE OF KARNAK. Climb out of the shallow pit and follow the ramp up to an outdoor area.
OUTDOOR AREA WITH TOPPLED BLOCKS: To the left (south) there are several doorways between square columns. To the right (north) there’s a raised opening surrounded by carvings. Straight ahead (west) there’s an opening high on the wall, which you can’t reach yet. Pick up the shotgun shells on one of the blocks below the high opening. Then approach the middle doorway of the three with the square columns. A black scorpion emerges. Kill it and pick up the small medipack in the alcove at the back of the room on the left. The second alcove from the right has some flares. Step into that alcove and quickly hop back firing as another black scorpion comes out of the right corner alcove. Pick up the flares. Then return outside and head straight across to the raised opening with the carvings.
TWO-STORY ROOM WITH SQUARE PILLARS: As you enter the building, immediately turn right and proceed with pistols drawn. Shoot the 2 black scorpions that appear on the right and left as you enter the low-ceilinged room ahead.
There are three carved blocks and three openings in the ceiling on the east side of this room. Climb onto the block on the right. Turn around, pull up through the opening, and immediately draw pistols to shoot another black scorpion that emerges from the far left alcove. Pick up some Uzi ammo in the first alcove on the left. Then turn around and approach the broken column near the openings in the floor. If you have flares to spare, light one and toss it into the alcove directly ahead. Now move onto the square between the left and middle openings in the floor and turn to face the alcove where you just tossed the flare. Another black scorpion spawns there. Kill it. Then pick up some wideshot shotgun ammo in the next alcove along the north wall.
Move between the square columns to the middle of the room facing west. Jump straight up to grab the bars on the ceiling. Monkey swing forward then to the right until Lara is hanging in front of the carved square column. Drop onto the ledge below. Take a standing jump into the dark alcove to the north to retrieve some flares. If you don’t want to waste a flare locating more flares, you can use pistol fire to illuminate the alcove. Jump back across the gap to the previous ledge. Jump to the next ledge, then the alcove on the south side of the room where you’ll find a box of shotgun shells. (If you miss any of these jumps and fall to the lower level, just move onto one of the raised areas of floor and jump straight up to grab one of the upper-level ledges.) After picking up the shotgun shells in the south alcove, jump over to the long, sandy ledge on the west side of the room. Follow it to the far end, picking up Uzi clips and a small medipack at the corner. Drop down and continue to the deep pit.
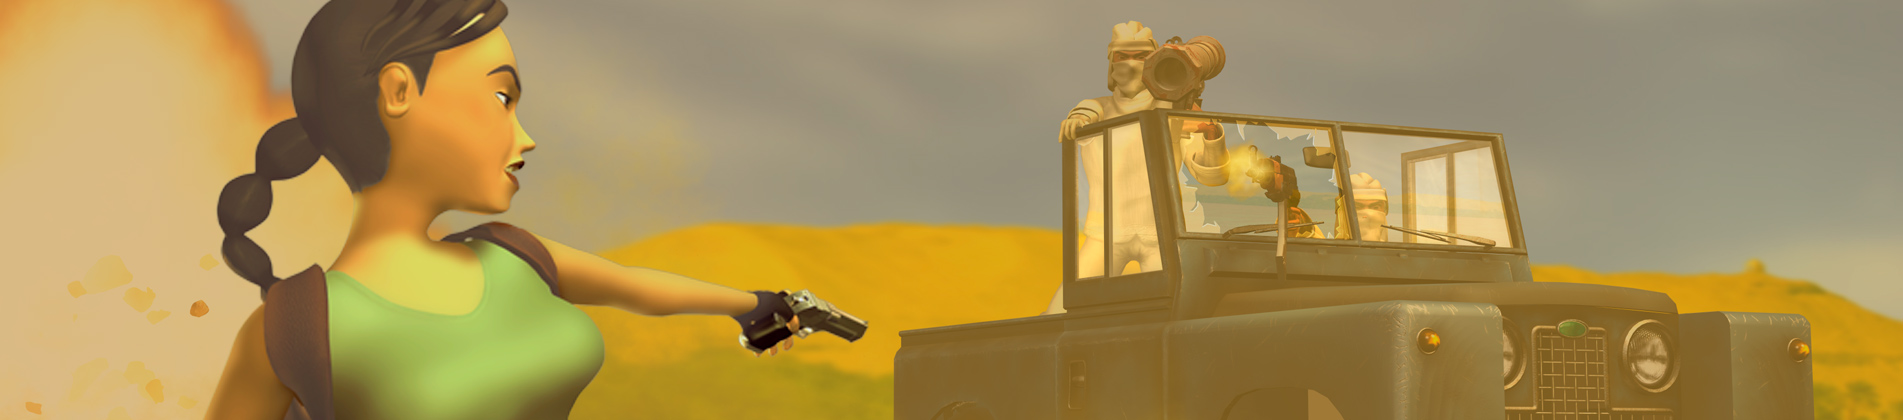
Cutscene: Two Land Rovers arrive, along with Von Croy’s car. Von Croy gets out and orders his henchmen to go after Lara.
Move to the left side of the pit, where the edge juts out a little farther, and take a running jump to grab the opposite edge. Pull up and continue around the corner to the right.
SMALL OPEN SPACE BETWEEN BUILDINGS: Notice the crawlspace in the northwest corner. You’re missing the key that opens the door at the end of that passageway. So, for now, go through the square opening to the north.
ROOM WITH UNEVEN FLOOR AND HIEROGLYPH-INSCRIBED WALLS: Just inside on the left there’s a small medipack on the floor and Uzi clips on a ledge. Get them. Then enter the adjoining room and slide down the ramp into the next level.